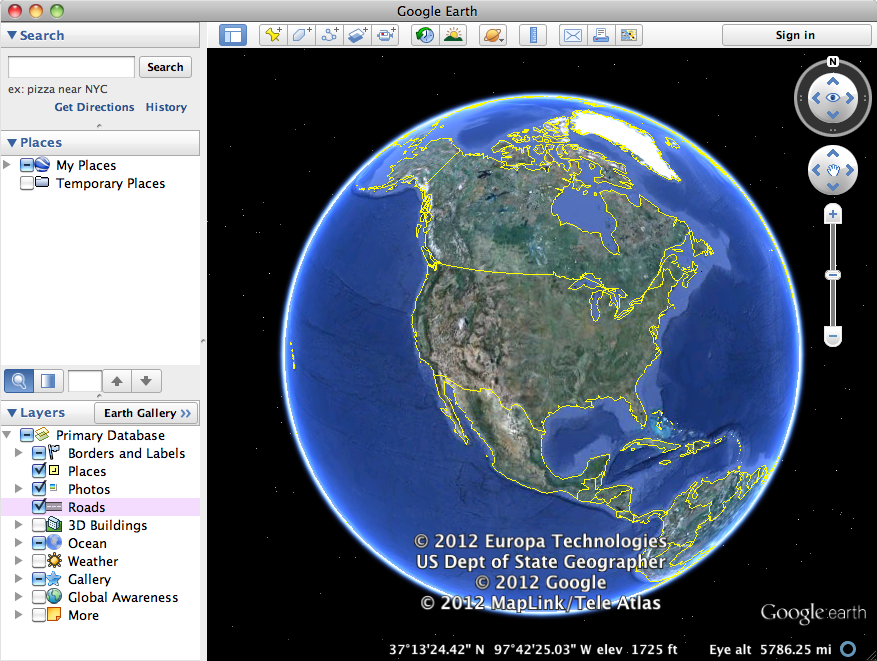
Google Earth provides a complete set of controls for simulating a three-dimensional view of the Earth.
Zooming In to or Out of the Earth
You can get a closer look at the Earth by zooming
into (approaching) it, or get
a larger view by zooming out of (receding
from) it.
There are three basic ways to zoom:
-
Scroll:
- Using a mouse with a scroll wheel, turn it away from
you to zoom in, and towards you to zoom out.
- Using a Macintosh trackpad, drag two fingers away from you to zoom in, and towards you to zoom out.
If this seems counterintuitive, you can reverse
this setting:
- On Windows, click on the menu Tools and
then on the menu item Options…;
- On Macintosh, click on the menu Google Earth and
then on the menu item Preferences…;
In either case, in the tab Navigation,
check the checkbox  Invert
Mouse Wheel Zoom Direction.
Invert
Mouse Wheel Zoom Direction.
-
Navigation
Controls:

Zoom
Control
The navigation controls will appear automatically when you move the cursor into the upper right corner of the Display pane.
The slider at the bottom is the zoom control,
and you can click on the + end
to zoom in, and the – end
to zoom out (see the image at
the right).
You can also drag the slider in the middle to
continuously zoom in or out.
If you want the navigation controls to always show or never show, you can change their behavior by clicking on the menu View and
then on the menu item Show Navigation, and finally on the appropriate submenu item.
-
Keyboard:
| Page
Up |
zoom
in |
| Page
Down |
zoom out |
Note that in each of these cases, the location on
the Earth that is at the center of the screen will remain at
the center (more or less).
Zooming in Google Earth is not simply magnification;
you are given the view you would
see if you were positioned at a certain distance
above the Earth’s surface, which is called the eye altitude. The primary difference is that your horizon (the edge of what you can see) will decrease as you approach the Earth.
The eye altitude is shown in the lower right corner
of the Display pane; notice how it changes as you
zoom in and out.
Moving Around the Earth
The simplest way to change your view of the Earth
is to move or, more precisely, translate across
it, as if you were walking forward or backward or
stepping left or right.
This is equivalent to rotating the Earth, but it’s
hard to imagine this when you are close to its surface.
As with zooming, there
are three basic ways to move around:
-
Click-and-drag:
With the mouse, point at the Earth and you’ll
notice that the cursor changes to a  hand.
hand.
Then
click on the Earth and drag
it opposite to
the direction you want to move — imagine you’re
spinning a real globe.
One cool thing you can
do is click on the Earth, drag it a short
distance, and then without
stopping release
the mouse, as if you are “throwing” the
Earth; this will make you drift across
the Earth continuously.
Click
anywhere in the Display pane to stop the
drift.
-
Navigation
Controls:

Translation
Control
The navigation controls will appear automatically when you move the cursor into the upper right corner of the Display pane.
The lower disk (with the hand)
is the translation
control
(see the image at
the right). You can click on one side of it in the direction
you want to move.
You can click and hold for continuous
movement, and even slide around the edge
to smoothly change directions.
The closer to the
edge of the disk, the greater or faster the
motion.
-
Keyboard:
If necessary, click in the Display pane (since the keyboard can also be used to move around in the other panes). The, use one of the
four arrow keys (or the ADSW keys if you are
left-handed) to move your view in the direction
you want to go:
| |
|
↑
W |
forward |
|
|
←
A |
left |
↓
S |
backward |
→

D |
right |
You can also use two arrow keys at a time to
move in the direction midway between them.
If you also hold down the Alt key
(on Windows) or the Option key
(on Macs), the speed of your motion will be much
slower.
In addition to displaying images of the
Earth’s surface, Google Earth also shows you information
about the surface location the cursor points at, at the bottom of the Display pane:
- latitude and longitude (north-south
and east-west geographic
coordinates),
and
- elevation (distance
above sea level) .
Try moving the hand
across the Earth and notice how these values
change.
The geographic coordinate grid can be displayed by
clicking on the menu View,
and then the submenu Grid.
Flying to a Location on the Earth
Quite often you will want to zoom in to a particular location that
might be visible but isn’t at the center of the
screen.
You can quickly fly to a
location by double-clicking on it; Google Earth will
center it and also zoom
in to that position by a fixed amount.
If you right-double-click on a location,
Google Earth will center it but zoom out by a fixed
amount.
 As
with drifting, click anywhere in the Display pane
to stop the fly-to motion.
As
with drifting, click anywhere in the Display pane
to stop the fly-to motion.
You can regulate this process more directly by right-clicking in
the Display pane, whereupon crosshairs and/or a double-arrow will appear;
then move the mouse forward or backward to zoom as
much as you want.

Street
View
 When you are close enough to the Earth, about 300 miles above its surface, the Street View icon will appear in the navigation controls. If you drag it to a particular location, Google Earth will zoom all the way into the surface of the Earth and enter the Street View mode.
In much of the developed world and in many highly urbanized areas, Street View will include actual photographs of the street, as if you were standing on the ground looking around you. If such photos aren’t available, it will construct a horizontal view from aerial photographs.
The navigation controls described previously will work more or less the same way in Street View (but not the ones to be described subsequently).
You can can return to Google Earth's normal aerial photographs by clicking on the button Exit Street View in the upper right corner of the Display pane; however, it will remain close to the ground, in a tilted view of the Earth's surface.
Searching for Locations
Google Earth’s pane Search understands location
information in a number of different formats, and
will fly to the locations it finds.
For example, try these:
- Massachusetts
- Amherst, MA
- College St. and S. Pleasant St., Amherst, MA
- Amherst College
- A pair of numbers representing geographic coordinates
(latitude and longitude):
- 42° 22' 12" N,
72° 31'
3" W
- 42
22 12 N, 72 31 3 W
- 42.37,
-72.5175 (order is significant
if you don’t include N, S, E, or W)
If you don’t remember what these last pairs of numbers represent,
you can read more about it here.
 In addition to moving in straight lines, Google Earth also provides
controls to orbit around a central location.
In addition to moving in straight lines, Google Earth also provides
controls to orbit around a central location.
This capability lets you, for example, look at the sides of
a mountain rather than simply looking down on it
from above.
To best illustrate orbiting, you should first translate your position
so that you are above a mountain or valley, for example Mt. Monadnock in southwestern New Hampshire (pictured, with Amherst in the distance), or Mt. Everest on the Nepal-China border.
As with translational motion, there are three basic ways to orbit
(for best effect you should be relatively close to
the ground):
-
Click-and-drag:
Hold
down the Shift key
and click-and-drag the mouse to the left or right
to orbit the central location counter-clockwise
or clockwise, respectively.
Note
that crosshairs will appear to clearly mark the
central location.
This change in orientation is called the heading,
and is measured from north (0°) clockwise to east (90°)
to south (180°)
to west (270°), and back to north (360°)
Hold down the Shift key
and click-and-drag the mouse away from or towards
you, to orbit backward/downward
or forward/upward, respectively, around the central
location.
This change in orientation, called the tilt, is constrained
between the horizontal (90°) and vertical (0°) directions,
respectively.
-

Orbit/
Rotation
Controls
Navigation
Controls:
With the mouse, point at the upper right corner of the Display
pane, whereupon the navigation controls will appear.
The upper disk is surrounded by a compass ring,
with the letter N to indicate north
(i.e. towards the North Pole of the Earth); you
can click-and-drag this ring to orbit clockwise
or counter-clockwise, i.e. change your heading.
Click on the N to
orbit until north is directly forward.
There is no display control for tilting (orbiting backward/downward or
forward/upward) in the latest version of Google Earth.
-
Keyboard:
If necessary, click in the Display pane. Then use the arrow or ADSW keys while holding down the Shift
key:
| |
|
Shift ↑
Shift W |
orbit
forward/upward |
|
|
Shift ←
Shift A |
orbit
counter-clockwise |
Shift ↓
Shift S |
orbit
backward/downward |
Shift →
Shift D |
orbit
clockwise |
There are also a couple of special keystrokes you can use to reset
your orientation:
N will orbit you towards the north (the same
as clicking on
N in the compass ring);R will “right” you by orbiting you towards
the north and orbiting
you forward/upward to be above the central location.
Since you will often be viewing terrain from a distance, it can
enhance your view of it to improve its appearance
and/or exagerate its elevation, as follows:
- Open Google Earth’s Options/Preferences:
- On Windows, click on the menu Tools and
then on the menu item Options….
- On Macintosh, click on the menu Google Earth and
then on the menu item Preferences….
- In
the dialog that appears, Google Earth Options or
Preferences, click
on the tab 3D
View.
- In the section Terrain Quality, make sure the checkbox Show Terrain is on.
- Drag
the slider between Lower and Higher.
Note that the former draws faster, while the
latter draws more slowly.
- In the text field Elevation Exaggeration,
type in a multiplicative factor, e.g. 3.
- Click on the button OK.
Try orbiting around an elevated feature after you’ve enhanced the
terrain quality, and notice the difference in how
it looks.
Rotating Your View of the Earth
It is also possible to rotate your
view of the Earth (change your heading and tilt), without changing
your position.
Imagine turning your body left
or right, or nodding your head
up or down (these motions have the technical names yaw and pitch,
respectively).
As with translational and orbital motion, there are
three basic ways to rotate:
-
Click-and-drag:
Hold down the Ctrl key
(on Windows) or the Command key
(on Macs) and click-and-drag the mouse
to the left or right to rotate yourself
left/clockwise or right/counter-clockwise, respectively
(note: this is the opposite direction of orbiting).
Hold down the Ctrl key
(on Windows) or the Command key
(on Macs) and
click-and-drag the mouse away from or towards
you, to incline your view downward or
upward, respectively.
-
Navigation
Controls:
Orbit/
Rotation
Controls
With the mouse, point at the upper right corner
of the Display pane, whereupon the navigation
controls will appear.
Point at the upper disk
(with the  eye),
and click on the left or right side to
turn your view clockwise or counter-clockwise, respectively
(again changing your heading),
or click on the upper or lower part of it to incline
your view upward or downward (again changing your tilt).
eye),
and click on the left or right side to
turn your view clockwise or counter-clockwise, respectively
(again changing your heading),
or click on the upper or lower part of it to incline
your view upward or downward (again changing your tilt).
As with the translation control, you can click
and hold for continuous movement, and even slide
around the edge to smoothly change orientations.
And again, the closer to the edge of the disk,
the greater or faster the motion.
-
Keyboard:
If necessary, click in the Display pane. Then use the arrow keys while holding down
the Ctrl key (on Windows) or the Command key
(on Macs):
| |
|
Ctrl ↑
Command ↑ |
incline
upward |
|
|
Ctrl ←
Command ← |
rotate
left/clockwise |
Ctrl↓
Command ↓ |
incline
downward |
Ctrl →
Command → |
rotate
right/counter-clockwise |
Note: the ADSW keys cannot be used here, since
they are also used for menu selections.
To reiterate the difference between rotation and orbiting,
in the former you will stay in one location while
your view of the Earth will change, while
in the latter you move around
the fixed location at the
center of the screen.
Navigation Controls Summary
The following table summarizes the information above.
Note: The keyboard
controls only function
after you have clicked in the Display
pane (they have different actions in the other panes).
| Navigation Type |
Mouse |
Display |
Keyboard |
| Zoom |
In |
Scroll Wheel Away |
|
Page Up
|
| Out |
Scroll Wheel Towards |
|
Page Down
|
|
Move
(Translate) |
Left |
Click-Drag Right |
|
←
A
|
For
Slow Motion,
also press:
Win: Alt
Mac: Opt |
| Right |
Click-Drag Left |
|
→
D
|
| Forward |
Click-Drag Towards |
|
↑

                                W
|
| Backward |
Click-Drag Away |
|
↓

                                S
|
|
| Fly To |
Center & Zoom In |
Double-Click |
|
|
| Center & Zoom Out |
Ctrl Double-click
|
|
|
|
Orbit a
Location |
Counter-Clockwise |
Shift Click-Drag
Left
|
|
Shift ←

                                    Shift A
|
| Clockwise |
Shift Click-Drag
Right
|
|
Shift →

                                    Shift D
|
| Forward/Upward |
Shift Click-Drag
Towards
|
|
Shift ↑

                                    Shift W
|
| Backward/Downward |
Shift Click-Drag
Away
|
|
Shift ↓

                                    Shift S
|
| To the North |
|
|
N
|
| To the North and the Vertical |
|
|
|
|
Rotate
in Place
(Yaw & Pitch) |
Left/Clockwise |
Windows: Ctrl Click-Drag
Left
Mac: Command Click-Drag Left |
|
Win: Ctrl ←
Mac: Command ← |
| Right/Counter-Clockwise |
Windows: Ctrl Click-Drag
Right
Mac: Command Click-Drag
Right |
|
Win: Ctrl →
Mac: Command → |
| Upward |
Windows: Ctrl Click-Drag
Towards
Mac: Command Click-Drag
Towards |
|
Win: Ctrl ↑
Mac: Command ↑ |
| Downward |
Windows: Ctrl Click-Drag
Away
Mac: Command Click-Drag
Away |
|
Win: Ctrl ↓
Mac: Command ↓ |
Google Earth is customizable, allowing
you to create your own collections of information.
Creating Placemarks
You can often identify particular locations you are
interested in from terrain, streets, buildings, or
latitude and longitude.
You can save these locations for future
reference with placemarks,
which are indicated, by default, by yellow push-pins.
Placemarks also have a particular view of the Earth
associated with them (distance, heading, and
tilt), as shown in the picture at the right.
Any time you double-click
on a placemark in the panes Display or Places,
Google Earth will fly back to that location and provide
that view.
Placemarks can have labels next to them, and when
you click on them an information balloon will appear,
providing your own descriptions and images.
- To properly position the placemark, it’s
generally best to start from a vertical orientation,
so first press the key
R to “right”
yourself.
 In
the toolbar, click on the button
In
the toolbar, click on the button  Add
Placemark.
Add
Placemark.
- A placemark icon will appear at the center
of the view; click-and-drag it to your desired
location (the yellow square around it indicates
that it is movable).
- A dialog box Google
Earth —
New Placemark will also have appeared;
click in the text field Name and
give the placemark an appropriate label (or delete
the default text “Untitled Placemark” to have
no label).
- In the text field Description,
type in an explanation of the significance
of this location (you can start with a little
bit and come back and add more later); this
information will appear in a balloon when
you click on the placemark.
 You can choose a different marker for the
placemark by clicking on the button
You can choose a different marker for the
placemark by clicking on the button  :
:
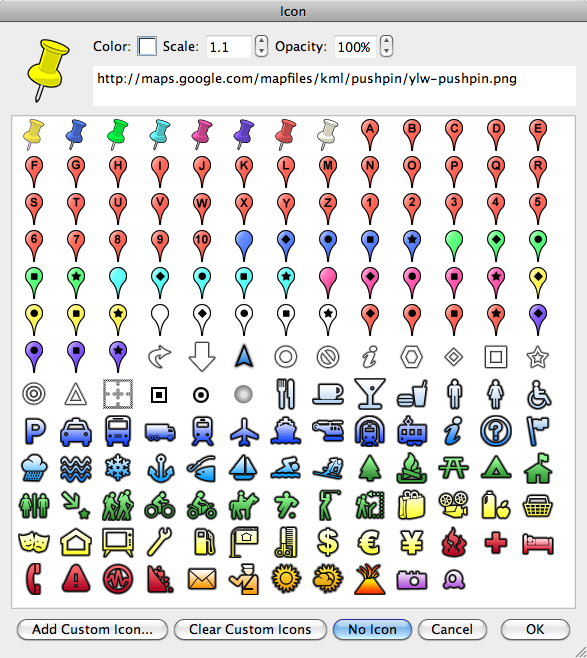
- In the dialog Icon, select
one from the provided collection
that might carry additional meaning,
e.g. a tent to represent a campground.
- Note
the button Add Custom Icon…,
which lets you use any small image in your local files, or provide a web address (URL) such as the one listed to the right of the big yellow push-pin.
- Click on the button OK.
- Click on the tab View,
and notice there are two pairs of latitudes
and longitudes here; the first represents
the location of the placemark, while the
second represents the location of you, the
viewer; if you aren’t directly above the placemark
they will be different.
- You can now move around and position your
view with the navigation
controls so that the placemark appears
in the way you want; then press the button Snapshot current view.
- Finally, click on the button OK to
save the placemark. It will now appear in the Places pane in a folder called My Places, whose content is automatically saved by Google Earth.
- The information in a
placemark (name, description, location, view,
etc.) can be changed later by right-clicking
on it (either in the Display pane or the Places pane) and selecting the menu item Properties (Windows) or Get Info (Mac).
Organizing and Touring Placemarks
A group of associated placemarks can be organized
by putting them together in their own folder, which
can then be “toured” in a sequence.
- In the pane Places,
right click on the folder where you want
your placemarks to be located, e.g.
My Places,
select the menu item Add,
and then the menu item Folder.
- A dialog box Google
Earth —
New Folder will appear;
click in the text field Name and
give the folder an appropriate title.
- In the text field Description,
explain the significance of the contents
of this folder (you can start with a little
bit and come back and add more later).
- Click on the button OK to
save the folder.
- You can now click-and-drag any of your placemarks
into your new folder, and arrange them in
the order you want to
“tour” them.
- By default, a folder
has a view of the map that lets you see all
of the placemarks it contains (double-click
on it to see that view). But you can change it to
any view you like, e.g. the same as the first
placemark, as follows:
- Move around and position your
view with the navigation
controls so that the folder’s
placemarks appear in the way
you want;
- Right-click on the folder and select
the menu item Snapshot
View.
- Folders can
be opened
and closed
in the Places list by clicking
on the button
 in
front of
their name.
in
front of
their name.
- One useful
feature of
folders is
that the
entire collection
of placemarks
they contain
can be turned
on or off
(removed
from visibility
on the map)
with the
checkbox in
front of
their name.
If you first select a folder before creating new
placemarks as described in Procedure
3, they will
automatically be stored in this folder.
Creating Paths
A collection of locations can be joined together into a path,
which appears in the Display pane as a colored line.
Paths can represent travel routes, rivers, or other linear features.
They can connect the same locations as a set of placemarks, to show
how they might be related to each other, e.g. by
geography or time.
If you go to another location, and then double-click on a path
in the Display or Places panes, Google Earth will
fly back to it and show its extent.
- To properly position the points in a path,
it’s generally best to start from a vertical
orientation, so first press the key
R to “right”
yourself.
- In
the toolbar, click on the button
 Add
Path.
Add
Path.
- A pathmark cursor
 will
appear on the screen; move
it to your desired locations and click on
them, one after another, and they will be
connected by a line.
will
appear on the screen; move
it to your desired locations and click on
them, one after another, and they will be
connected by a line.
Note that, because you
are using the mouse to create the path, you
can’t use it to navigate, so you must either
use the display controls or the keyboard
to change the view beyond the current
one.
- If you want to move a point after you’ve
created the path, simply click on it and
reposition it.
- If you
want to add more points
after you’ve completed the path, click on the
point immediately before the location
where you want to add more (as defined by the
original path creation direction);
then click where you want more points to appear.
- A dialog box Google
Earth —
New Pathwill also have appeared;
click in the text field Name and
give the path an appropriate title.
- In the text field Description,
explain the significance of this path
(you can start with a little bit and come
back and add more later).
- Click on the tab View,
and notice there is no specific information
here; the default view is just large enough
to see the path from directly above.
- If you want a different view of the path,
you
can now move around and position yourself
so that the overview of the path appears
in the way you want; then press the button Snapshot current view.
- Finally, click on the
button OK to
save the path.
- The information in a
path (name, description, points, view,
etc.) can be changed later by right-clicking
on it in the Places pane,
and selecting the menu item Get Info.
Like placemarks, new paths are stored in the folder called My Places,
which you can see listed in the pane Places.
Paths automatically have tours defined for them; simply click on
the path and then on the button  Play Tour.
You may find, however, that it is too slow, and that
you’ll prefer a manual excursion over the path.
Play Tour.
You may find, however, that it is too slow, and that
you’ll prefer a manual excursion over the path.
Saving Placemarks and Paths
Please note that the folder My Places is stored on the local computer, so it’s very important, when you are finished, to save a copy
of your work to your U: drive for use on other computers.
Simply menu File, then Save,
and finally Save Place As; the resulting
file is of the type .kml or compressed as .kmz . It can
then be easily sent to others and read into Google Earth
on another computer, though initially it will be placed
in the folder Temporary
Places.