Vector data such as points, lines, and polygons can
be extracted, created, and edited using ArcMap and
ArcCatalog. This is useful to, for example, save
a copy of a feature selection from a shapefile or "trace"
features on a scanned map.
Since this tutorial will be using specific maps and data, the first
step is to make your own copy of the tutorial data.
Set Up: Getting the Tutorial Data
- In the Windows Explorer, navigate to the
network drive
 K: (aka
\\Software\Winsoft), open the folder K: (aka
\\Software\Winsoft), open the folder  Maps,
and then open the folder Introduction to GIS. Maps,
and then open the folder Introduction to GIS.
- Drag the folder editingmapdata and
its contents to either:
- your network drive U:,
e.g. into the folder My Documents;
or
- the local hard drive
 C:,
e.g. onto your Desktop. C:,
e.g. onto your Desktop.
The folder editingmapdata contains
the following files:
 states.shp states.shp |
cities.shp |
Since some — but not all — of the ArcGIS components have
trouble handling names with spaces or special symbols, do not rename
the folders or files.
Set Up: Initializing ArcMap and Adding the States Layer
- Start up the
 ArcMap software
(see Constructing
and Sharing Maps for details). ArcMap software
(see Constructing
and Sharing Maps for details).
- In the toolbar Standard,
click on the button
 Add
Data. Add
Data.
- In the dialog Add
Data, navigate into the folder editingmapdata;
if necessary, make a new connection
to it first (see Constructing
and Sharing Maps for details).
- In the folder editingmapdata,
click on the file states.shp.
- Click on the button Add.
ArcMap will now display the map of the United States that we saw
before:
Selecting Map Features
Before you can edit map features, you must first select the
ones you want!
ArcGIS
provides a number of ways to search for and select
different parts of a layer's data.
Selecting Map Features on the Map
When you select features on a map, they will be highlighted with
an aqua-colored outline, making them easy to distinguish from the
others.
In ArcMap:
- To select a single
map feature*:
- In the toolbar Tools, click
on the tool
 Select Features(if
necessary). Then, click on a map feature. Select Features(if
necessary). Then, click on a map feature.
- To select multiple contiguous map
features:
- In the toolbar Tools, click
on the tool Select Features(if
necessary). Then, click and drag the cursor across multiple
feature. Note that this displays a rectangle on the map,
and any feature that intersect the rectangle will be selected.
- To select multiple noncontiguous
map features:
- In the toolbar Tools, click
on the tool Select Features(if
necessary). Then, click on the first feature (if there isn't
one already selected). Now hold down the
Shift key,
and click on additional features.
- To deselect specific map features:
- In the toolbar Tools, click
on the tool Select Features(if
necessary). Then, hold down the
Shift key,
and click on the features you want to deselect.
- To deselect all map features*:
- In the toolbar Tools, click
on the tool
 Clear Selected Features. Clear Selected Features.
- To zoom in to all selected map features*:
- In the menu Selection, click
on the menu item
 Zoom To Selected Features. Zoom To Selected Features.
- To zoom in to selected map features
in a single layer:
- In the Table of Contents, right-click
on the layer's name. In the contextual menu that appears,
point at the menu item Selection.
In the submenu that appears, click on the menu item Zoom To Selected Features.
*These items are also available in a contextual menu that appears
when you right-click on a map feature or the map itself (as
appropriate)
Selecting Map Features in the Attribute Table
ArcMap maintains a direct link between the description of a feature
in an attribute table row and its representation in the map. Therefore,
when one is selected, so will be the other.
Experiment: Make sure that some features
are selected on the map. Then, open the attribute
table as described in Constructing
and Sharing Maps (if it isn't already open). Move the attribute
table around or resize it (click and drag on its
edges) so you can see all of the states on the map.
Scroll through the table until you come to those
features' records; how are they distinguished from
the others?
Before selecting features in the attribute table, you may find
it useful to sort the records as previously
described.
In ArcMap,
in a layer's Attributes table:
- To select a single
map feature:
- At the left end of one record, click on the button
 Select
Record. Select
Record.
- To select multiple contiguous map
features:
- At the left end of one record, click and hold on the button Select
Record. Then drag down the list to select multiple
records.
Or: At the left end of one record, click
on the button Select
Record(if necessary). Then hold down the Shift key
and click on another button Select
Record, to select everything in between.
- To select multiple noncontiguous
map features:
- At the left end of one record, click on the button Select
Record(if necessary). Then hold down the
Ctrl key
and click on another button Select
Record. Note that this key is different than
the one used for the same purpose on the map itself,
but similar to the way that Excel functions.
- To deselect specific map features:
- At the left end of the record you want to deselect, hold
down the
Ctrl key and click on the button Select
Record. Note that this key is different than
the one used for the same purpose on the map itself, but
similar to the way that Excel functions.
- To deselect all map features in this
layer:
- At the left end of one of the selected records, right-click
on the button Select
Record. In the contextual menu that appears, click
on the menu item
 Clear
Selected. Clear
Selected.
- To zoom in to all selected map features:
- At the left end of one of the selected records, right-click
on one of the buttons Select
Record. In the contextual menu that appears, click
on the menu item Zoom To Selected.
- To display only the selected map
features in the table:
- At the bottom of the table, click on the button Show: Selected.
Click on the button Show: All to
restore the complete list.
Selecting Map Features by Their Attributes
An important property of ArcGIS is its ability to select features
in a general way based on their attributes.
This is particularly important when you have a large number of records
or if you can't visibly distinguish them.
- In ArcMap,
in the menu Selection,
click on the menu item
 Select By Attributes…. Select By Attributes….
- In the dialog Select By Attributes,
in the menu Layer:,
make sure the layer from which you want to
select features is displayed, e.g. states.
- In the menu Method:, choose
what you want to do with the features you'll select:
- Create a new selection
- Add to current selection
- Remove from current selection
- Select from current selection
- In the field SELECT * FROM layer WHERE:,
click and define a logical expression, or query,
to choose the features you want.
Queries can be very specific, using any of the attribute
values provided in the table.
 In
the example shown, the attribute "SUB_REGION" is
used to select any state on the eastern seaboard by combining
the three possibilities with OR. These are grouped with
parentheses, and the resulting set is then limited by the
AND statement that requires their attribute "POP00_SQMI"
to be greater than or equal to 200 people
per square mile. In
the example shown, the attribute "SUB_REGION" is
used to select any state on the eastern seaboard by combining
the three possibilities with OR. These are grouped with
parentheses, and the resulting set is then limited by the
AND statement that requires their attribute "POP00_SQMI"
to be greater than or equal to 200 people
per square mile.
When defining a query:
- When you are finished defining your query, you can click
on either of the buttons Apply or OK to
see its effect.
Duplicating and
Reprojecting a Feature Set
The most basic form of editing is to duplicate a feature set in whole
or in part; at the same time, you can reproject it.
Duplicating Features with
ArcMap
Quite often you will want to make your own copy of a data set.
This can be useful if you only need to work with one part of a much
larger data set, or if you are using a server's data
and need to modify it.
In the same process, ArcMap lets you reproject the data into
the spatial reference of the data frame, if you so
choose.
- If you only want to duplicate part of a data
set, first select those features as previously
described, or change your view of the map
to include just those features.
- If you want to reproject a data set, change the data frame's
spatial reference to the desired one.
- In ArcMap,
in the Table of Contents,
right-click on the name of the layer, e.g. states.
- Right-click on the layer to open its
contextual menu, point at the menu item Data,
then in the submenu that appears click on
the menu item Export Data….
- In the dialog Export Data,
in the menu Export, choose
which part of the data set you wish to duplicate:
- All features (the
default when nothing is selected)
- Selected features (the
default when something is selected)
- All features in the View Extent (i.e.
those features currently visible in the map window,
in whole or in part)
- In the button set Use the same coordinate system as:,
choose between retaining this layer's source data (the
default) or using the spatial reference of
the data frame.
- Near the text field Output shapefile or feature class::
- Click on the button
 Browse; Browse;
- In the dialog Saving Data,
navigate to an appropriate location
for the new data set, e.g. the folder editingmaps;
- Give the new layer a descriptive
name, e.g. Populous
Atlantic States.shp;
- Click
on the button Save.
- Click on the button OK.
- The dialog ArcMap will
now appear, asking if you want to add the
exported layer to the map; click your preference Yes or No.
You can also duplicate an entire data set in ArcCatalog, and often change its format.
Creating
and Editing Features
ArcGIS has a complete set of editing tools that can be used to both
create features, modify their shape, and change their
attributes.
Creating a New Empty Feature Set with ArcCatalog
Recall that ArcCatalog is the program for establishing the basic
characteristics of a data set, e.g. its projection.
It will probably be no surprise, then, that you will also use ArcCatalog
to create new shapefiles from scratch.
- Start
 ArcCatalog: ArcCatalog:
- If you are already
in ArcMap,
look in the toolbar Standard and
click on the button ArcCatalog.
- Otherwise:
 Click on the
menu Click on the
menu  Start; Start;- Point at the menu item All Programs;
- If you are in
the public labs, point at the menu
item
 Course-related; Course-related;
- Then point at the menu item ArcGIS;
- Click on the
menu item ArcCatalog.
- In ArcCatalog,
in the left pane, navigate to the folder
where you want to create the new feature
set, e.g. the folder editingmaps.
If
necessary, make a new connection first by
going to the toolbar Standard and
clicking on the button  Connect
to Folder. Connect
to Folder.
- Right-click on the target folder and,
in its contextual menu, point at the menu
item
New, and then in the submenu
that appears click on the menu item
 Shapefile…. Shapefile….
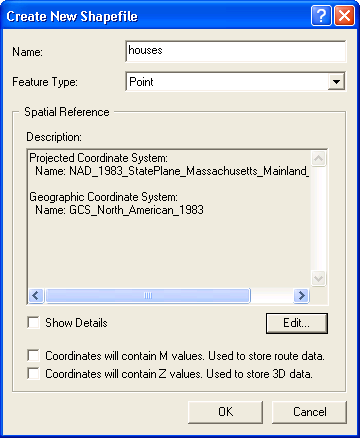
- In the dialog Create New Shapefile,
in the field Name:, type in
the name of your new shapefile, e.g. houses.
- In the field Feature Type:,
choose the type of shapefile, Point, Polyline, Polygon, etc.
- In the area Spatial Reference,
click on the button Edit….
- In the dialog Spatial Reference Properties,
define the new shapefile's spatial reference
(see Mapping
Geographic Coordinate Data for details), e.g. NAD_1983_StatePlane_Massachusetts_Mainland_FIPS_2001.
- Back in the dialog Create New Shapefile, click on the button OK.
An empty shapefile will need to have features added
to it, and usually this will occur in the conjunction
with another layer from which you can extract
information.
Exercise: Preparing a Shapefile for Editing
The first step in creating a new shapefile is
having a good background layer to compare with;
you'll use an orthophoto of Amherst here.
- Return to ArcMap:
- If it's
already running, switch to it, look
in the toolbar Standard and
click on the button
 New
Map File; New
Map File;
- If it's
not already running and you are still
in ArcCatalog,
look in the toolbar Standard and
click on the button ArcMap.
- In the toolbar Standard,
click on the button Add
Data.
- In the dialog Add Data,
navigate into the folder K:\Maps\Local Data\Amherst\Orthophotos;
if necessary, make a new connection to it
first (see Constructing
and Sharing Maps for details).
- In the folder Orthophotos,
click on the file
 amherst_2004.sid. amherst_2004.sid.
- Click on the button Add.
- Zoom into the area of
Amherst College (slightly northwest of center).
- Now add the empty shapefile by again
clicking on the button Add
Data, navigating to
the folder editingmaps,
and adding the shapefile you created in Procedure
5 above,
 houses.shp.
You will use it to mark the locations of several
residence halls on campus. houses.shp.
You will use it to mark the locations of several
residence halls on campus.
By default, a new shapefile has only the minimal number
of attributes: its field identifier (FID), its geometry
(Shape), and a default integer Id field to ensure
that there is at least one additional field present.
One of the first things you'll want to do is add
another field to hold your own descriptions
of the records.
Important Note: Unlike
spreadsheets such as Excel, database programs like
ArcMap treat rows (records) and columns (fields)
as very distinct structures. Therefore, you cannot
add fields to or delete fields from a shapefile when
you are in the record-oriented Editing
mode (described subsequently).
- In ArcMap,
open the shapefile's attribute table as described
in the document Constructing
and Sharing Maps in the procedure Viewing
a Map Layer's Attribute Table.
Note that
you can also modify the attribute table in ArcCatalog,
in the shapefile's Preview page.

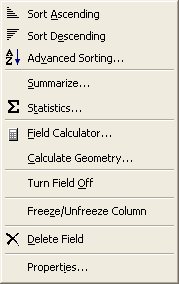
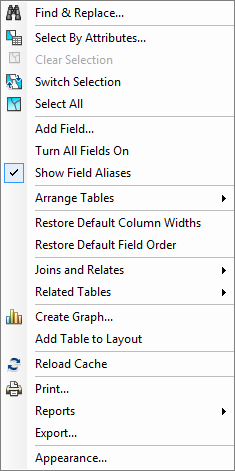 In the dialog Table, click on the button In the dialog Table, click on the button  Table Options,
and in its menu click on the item Add Field…. Table Options,
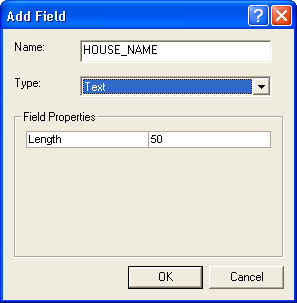
and in its menu click on the item Add Field….- In the dialog Add Field,
in the field Name,
type in a name for the field, e.g. HOUSE_NAME.
Remember the limitations on field names described
in Mapping
Place Name Data in the procedure Making
an Excel File Compatible with ArcGIS,
Step #1.
- In the field Type,
choose a data type for the field, e.g. Text.
The available data types are described in Mapping
Place Name Data in the section
Making
Attribute Fields Compatible.
- In the area Field
Properties,
you can specify the size and other properties
of the field, e.g. the number of
characters in a text field.
- Click on the button OK.
Now that you have added another field to your shapefile,
the
integer field Id is
no longer necessary, so unless you have a need for
such a field, it's a good idea to clean up your attribute
table by deleting it.
Important Note: Unlike
spreadsheets such as Excel, database programs like
ArcMap treat rows (records) and columns (fields)
as very distinct structures. Therefore, you must
exit the record-oriented Editing mode before you
can add
fields to or remove fields from the attribute table of
a shapefile.
A map document can bring together a large
number of different layers and errors can accidentally
affect a large number of features; therefore
editing of a layer occurs in a separate Editing
mode that requires a bit of preparation.
- In ArcMap,
in the toolbar Standard,
click on the button
 Editor Toolbar. Editor Toolbar.
- The Editor Toolbar will
appear; you can dock it in a convenient location
if you want:

- In the toolbar Editor,
click on the button Editor,
and in its menu click on the button
 Start Editing. Start Editing.
- If there is more
than one folder of editable data in your
map, you will be presented with the dialog Start
Editing and forced to choose a
subset to work on:
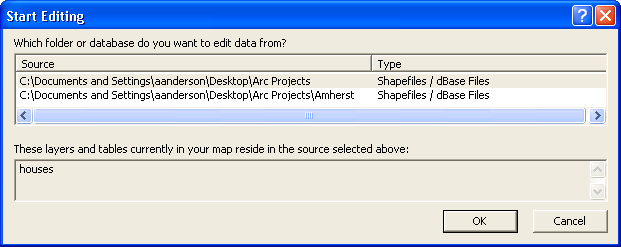
- In the list Which
folder or database do you want
to edit data from?,
make sure that the correct folder
is selected, so that the shapefile
you want to edit appears in the
field These
layers and tables currently in
your map reside in the source
selected above:.
- Click on the
button OK.
- In the toolbar Editor, in the menu Target,
make sure that the layer you want to
edit is selected, e.g. houses (important
if there is more than one file in the folder).
- As when working on documents in most other
programs, any changes you make in Editing
mode will not be saved until you explicitly
do so.
Therefore, whenever you are satisfied with
the changes you have made, go to the toolbar Editor, click on the button Editor,
and in its menu click on the button  Save Edits. Save Edits.
- While editing, if you want to switch
to a different shapefile, and:
- it's in the same folder, return
to Step 5;
- it's in a different folder,
continue to Step 8 and then start this
procedure from the beginning.
- When you are finished
editing records, go to the toolbar Editor, click on the button Editor,
and in its menu click on the button
 Stop Editing. Stop Editing.
- If you have not yet saved your edits, the
dialog
Do you want to save your edits? will
appear; answer the question by clicking on
one of the buttons Yes or
No, or Cancel to return to editing.
You will now add points for a few of the houses you recognize in the
Amherst orthophoto; this campus
map might be helpful.
- In ArcMap,
make sure you have added the shapefile you
want to modify, and start editing as described
in Procedure
8, Steps 1-5.
 Click
on the button Click
on the button  Sketch Tool;
the cursor will change to a transparent aqua
circle with crosshairs. Sketch Tool;
the cursor will change to a transparent aqua
circle with crosshairs.- All features in shapefiles are described
by one or more points, which for polylines
and polygons are called vertices since
they connect line segments.
Polygons differ from
polylines by always connecting the last
point to the first point.
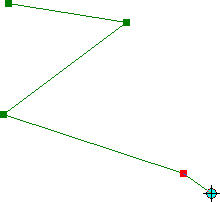
Click anywhere on the map to start creating
the feature, called a sketch,
and
a tiny red square will appear to mark this
point; if the feature is:
- a point, a single
click is all you need;
- a polyline or polygon, click
once for each additional vertex,
except double-click for
the last vertex.
Note that when you create a new
vertex, the previous vertex turns
green.
If you make a
mistake, press the key Ctrl-Z to
undo the most recent click, or the
key Ctrl-Delete to
delete the current sketch in its
entirety.
- If you want, save your new feature as described
in Procedure
8, Step 6.
- If you want to add additional
new features to this shapefile, repeat Steps
3 and 4 for each one.
- Stop editing as described
in Procedure
8, Steps 8 and 9.
Just for practice, delete two of the house
points you just created, one from the map and one
from the attribute table:
- In ArcMap,
make sure you have added the shapefile you
want to edit, and start editing as described
in Procedure
8, Steps 1-5.
- To delete a feature:
- When you see the feature on the map:
- In
the toolbar Editor,
make sure that the
 Edit Tool is
selected. Edit Tool is
selected.
Note that this
is the same as the tool Select Featuresin
the toolbar Tools,
but it's different from
the tool  Select Elementsin
the toolbars Standardand Drawing. Select Elementsin
the toolbars Standardand Drawing.
- Click once on any part
of the feature you want
to delete.
- Press
the key
Delete.
- When you see the feature in the
attribute table:
- At the left end of the
record, click on the
button Select
Record.
- Press the key
Delete.
- If you want, save your changes as described
in Procedure
8, Step 6.
- If you want to delete additional features
in this shapefile, repeat Steps 2 and 3 for
each one.
- Stop editing as described in Procedure
8, Steps 8 and 9.
Now edit the attribute table of the house features
you've created, to add their names:
- In ArcMap,
make sure you have added the shapefile you
want to edit, and start editing as described
in Procedure
8, Steps 1-5.
- In the Table of Contents,
right-click on the name of the layer whose
attributes you want to modify, e.g. houses.shp.
- In the layer's contextual
menu, click on the menu item
 Open Attribute Table. Open Attribute Table.
- In the layer's Attributes table,
locate the feature record you want to modify.
You may find it helpful to move the table around
so you can see the map and select the feature
there as described in Procedure
2.
- In that features's record, double-click in
the field you want to modify, and type its
new value.
- If you want, save your
changes as described in Procedure
8, Step 6.
- If you want to modify additional features
in this shapefile, repeat Steps 4, 5, and
6 for each of them.
Note that, like Excel, you can
press the key Enter to
move to the same field in the next record,
or Shift-Enter to move to the
previous record.
- Stop editing as described
in Procedure
8, Steps 8 and 9.
Sometimes you will want to make changes to the geometry of a feature, either as a whole or to individual
vertices.
- In ArcMap,
make sure you have added the shapefile you
want to edit, and start editing as described
in Procedure
8, Steps 1-5.
- Make sure that the Edit Tool is
selected, and then:
- If you want to move the entire feature:
- Click
on it once and wait
for it to be selected;
- Click on it again and drag
it to its new position.
 If you want to move a vertex
of a polyline
or polygon: If you want to move a vertex
of a polyline
or polygon:
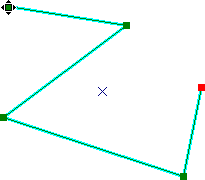
- Double-click anywhere on
the feature; its outline
will change to an aqua-highlighted
thin line, and its vertices
will appear as small green
and red boxes.
- Point the cursor at the vertex
you want to change, and wait
for the cursor to change
to a box with triangles on
each side.
- Click and drag the vertex
to its new position; the aqua-highlight
will remain in its original location.
- Click anywhere
away from the sketch to see the
effect of the change.
- If you want to delete a vertex
of a polyline
or polygon:
- Double-click
anywhere on the feature; its
outline will change to an aqua-highlighted
thin line, and its vertices
will appear as small green
and red boxes.
- Point the cursor at the vertex
you want to delete, and wait
for the cursor to change
to a box with triangles on
each side.
- Right-click on the vertex, and
in its contextual menu click
on the item Delete
Vertex.
- Click anywhere away from the
sketch to see the effect of
the change.
 If you want to insert a new vertex
into a polyline
or polygon: If you want to insert a new vertex
into a polyline
or polygon:
- Double-click anywhere on
the feature; its outline
will change to an aqua-highlighted
thin line, and its vertices
will appear as small green
and red boxes.
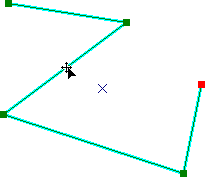
- Point the cursor at the spot
along the outline where you want
to add the vertex, and wait for
the cursor to change to a four-way
arrow.
- Right-click on the outline, and
in its contextual menu click
on the item Insert
Vertex.
- Click anywhere
away from the sketch to see the
effect of the change.
 If
you know the coordinates you want
to assign to an existing point or
vertex: If
you know the coordinates you want
to assign to an existing point or
vertex:
- Double-click anywhere on
the feature; its outline
will change to an aqua-highlighted
thin line, and its vertices
will appear as small green
and red boxes.
- Either:
- Point
the cursor anywhere along
the sketch and right-click
on it, and in
its contextual menu click
on the item
 Properties…;
or Properties…;
or
- In the toolbar Editor,
click on the button Sketch Properties.
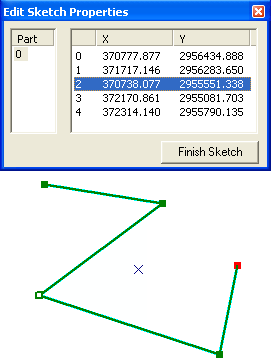
- In the dialog Edit
Sketch Properties,
one vertex will be selected,
and in the sketch it will
appear as a hollow square.
In a polyline/polygon you
can click on another vertex,
or use the up and down arrow
keys to move along the sketch.
- Click
on the coordinate(s) of the point/vertex
you want to change, and type
in the new value(s).
- Click on the button Finish Sketch.
- If you want, save your changes as described
in Procedure
8, Step 6.
- If you want to modify
additional features in this shapefile, repeat
Steps 2 and 3 for each one.
- Stop editing as described in Procedure
8, Steps 8 and 9.
Exercise: Creating a Line Shapefile
Locate the Fort River just to the south of Amherst's
campus, and create a line shapefile that follows
its course through the orthophoto.
|